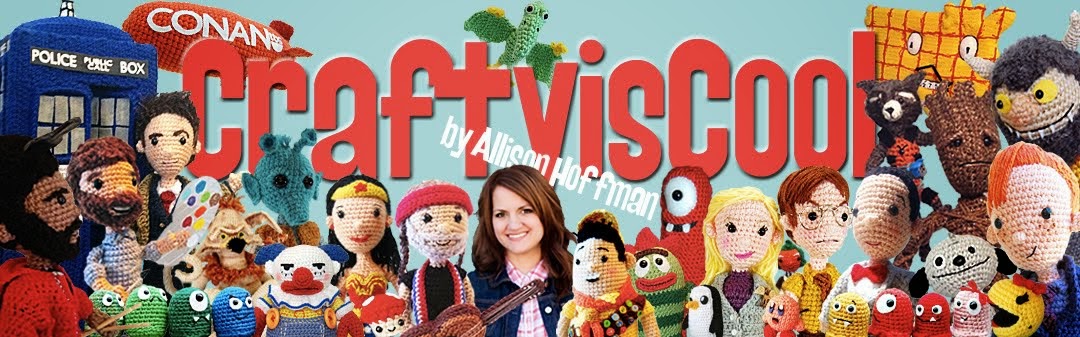
I made this doll the afternoon that we got home from seeing Black Panther in the theater. When my family and I were leaving the movie, I remember thinking how utterly magnificent the whole world of Wakanda is, and how great it is that so many kids had this hero to look up to. We lost Chadwick Boseman too early. He's my exact age. He graduated high school the same year as me. Full disclosure: losses like this, especially due to cancer, really trigger my anxiety, which is focused on health issues, and I usually deal with the after effects by dropping off of social media for a few days. But first I wanted to give back just a teeny tiny fraction of what this character gave to us. I'm going to make a video tutorial too. When that is ready the link will be added to this post. I hope you enjoy making your own King T'Challa.
I recommend using my new AmiguruME SkinTones yarn in Dark 1. The weight and color of the yarn work well for this pattern.
Black Panther
by Allison Hoffman
CraftyIsCool.com
info@craftyiscool.com
2018
Materials (Some Amazon Affiliate links):
Worsted weight yarn
Brown (A) I used AmiguruME SkinTones in Dark 1
Black (B)
Dark Gray (C)
Silver (D)
Sport weight yarn
Black (E)
*Yarns used listed at end of pattern.
Black 6mm safety eyes
Narrow dowel rod or chopstick
(1/4” diameter or less) cut to 4"
Polyester stuffing
16 gauge wire (to make doll posable)
Black embroidery floss
Scrap of pink yarn
Tools/Notions:
Size D and C Crochet hook
Yarn needle
Embroidery needle
Key:
ch: Chain
sc: single crochet
hdc: half double crochet
dc: double crochet
sc2tog: single crochet 2 st together
BLO: Crochet into back loop only of each st.
Bobble: Yarn over, insert hook in next st, yarn over and draw up a loop, yarn over and draw through 2 loops on hook; (yarn over, insert hook in same st, yarn over and draw up a loop, yarn over and draw through 2 loops on hook) 2 times, yarn over and draw through all 4 loops on hook.
Head:
Starting at top of head with yarn A and a D hook, make an adjustable ring, ch 1, and sc 6 into the ring. Pull closed.
Rnd 1: Work 2 sc into each st (12 sts)
Rnd 2: *(2 Sc into next st, sc into next st), rep from * to end of rnd (18 sts)
Rnd 3: *(2 Sc into next st, sc into next 8 sts), rep from * to end of rnd (20 sts)
Rnds 4-6: Sc into each st.
Rnd 7: Sc into next 10 sts, make bobble in next st, sc in next 9 sts (20 sts)
Rnd 8: Sc2tog, sc into each st (19 sts)
Rnd 9: Sc into each st.
Rnd 10: Sc2tog, sc into each st (18 sts)
**At this point you should insert a stitch marker and stuff the head firmly. Insert safety eyes positioned as shown, one row above bobble, 4 sts apart. Continue adding stuffing as you stitch the last couple of rounds if needed.
Rnd 11: Sc2tog three times, sc into next 6 sts, sc2tog 3 times (12 sts)
Rnd 12: Sc2tog around (6 sts)
Fasten off and use yarn tail and a yarn needle to stitch the last round closed. Clip yarn tail, hiding within head.
Body:
Starting at bottom of Body with yarn B and a D hook, make an adjustable ring, ch 1, and sc 6 into the ring. Pull closed.
Rnd 1: Work 2 sc into each st (12 sts)
Rnd 2: *(2 Sc into next st, sc into next st), rep from * to end of rnd (18 sts)
Rnds 3-8: Sc into each st.
Rnd 9: 2 Sc in next st, sc in each st around (19 sts)
Rnd 10: 2 Sc in next st, sc in each st around (20 sts)
Rnd 11: Sc in next 4 sts, 2 sc in next 2 sts, sc in next 8 sts, 2 sc in next 2 sts, sc in next 4 sts (24 sts)
Rnd 12: Sc in next 5 sts, 2 sc in next st, sc in next 12 sts, 2 sc in next st, sc in next 5 sts (26 sts)
Rnd 13: Sc into each st around.
Rnd 14: Sc in next 3, sc2tog four times, sc in next 4, sc2tog four times, sc in next 3 (18 sts)
Rnd 15: *(Sc2tog, sc in next st), rep from * to end of rnd (12 sts)
Insert a stitch marker to hold your place and stuff Body firmly. Continue inserting stuffing as you work the last few rounds.
Rnd 16: *(Sc in next st, sc2tog, sc in next st), rep from * to end of rnd (9 sts)
Rnd 17: Sc2tog, sc in each st around (8 sts)
Rnds 18-19: Sc in each st around.
Fasten off and leave a long tail for sewing. Set aside.
Insert dowel rod into the Head at the base, pushing in between stitches until secure. Insert other end of the rod into the neck of the Body, working it into the stuffing inside to hold securely. Use the tail from the neck to sew Head to Body. Weave in ends.
Legs:
Rnd 1: Starting at waist of Pants and with yarn B and a D hook, ch 20. Sl st to first chain to form a ring. Sc into each st (20 sts)
Rnds 2-5: Sc in each st.
First (Left) Leg:
Rnd 6: Sc into next 10 sts, skip next 10 sts (10 sts)
* This will split the piece in two, creating the first leg. Continue crocheting into only these 10 stitches of the leg.
Rnd 7: Sc into each st.
Rnd 8: 2 Sc in next st, sc in each st around (11 sts)
Rnds 9-14: Sc into each st.
Rnd 15: Sc in next 2 sts, sc2tog twice, sc in next 5 sts (9 sts)
Rnd 16: Sc in next 3 sts, 2 sc in next st, sc in next 5 sts (10 sts)
Rnds 17-22: Sc into each st.
Rnd 23: Sc in next 4 sts, sc2tog, sc in next 4 sts (9 sts)
Rnds 24-27: Sc into each st around.
Rnd 28: Sc2tog, sc in each st (8 sts)
Foot:
Row 29: Sc in next st, ch 1, turn to work in opposite direction, sc in next 4. Leave remaining stitches unworked (4 sts)
Rows 30-38: Ch 1, turn, sc in next 4 (4 sts)
Row 39: Ch 1, turn, sc in next st, sc2tog, sc in next st (3 sts)
Row 40: Ch 1, turn, sc in next st, 2 hdc in next st, sc in last st (4 sts)
Fasten off and leave a long tail for sewing.
Second (Right) Leg:
Rnd 6: Join yarn at 110th st of Rnd 5 with a sc, and sc into each st around (10 sts)
Rnds 7-28: Repeat Rnds 7-28 from First Leg.
Foot:
Rnd 29: Sc in next 7 sts, leave remaining sts unworked (7 sts)
Rnds 30-40: Repeat Rnds 30-40 from First Leg.
Fasten off and leave a long tail for sewing.

Use the beginning yarn tail to sew Pants to Body at waist. Weave in ends. Stuff each Leg.
Fold the Foot panels back so that Row 40 meets Rnd 28. Sew around the edges to close, adding stuffing as you close up the Feet. Weave in ends.
Arms (Make 2):
Rnd 1: Beg at hand end of Arm with A and D hook, make an adjustable ring, ch 1, and sc 3 into ring. Gently, but firmly, pull tail to close ring.
Rnd 2: Work 2 sc in each sc around (6 sts)
Rnds 3-5: Sc in each sc around.
Rnd 6: Make bobble in next st, sc into next 5 sts (6 sts)
Rnds 7-8: Sc in each st.
Rnd 9: 2 Sc in next st, sc in each st (7 sts)
Rnds 10-11: Sc in each st.
Rnd 12: 2 Sc in next st, sc in each st (8 sts)
Rnds 13-14: Sc in each st.
Rnd 15: Sc2tog twice, sc in next 4 sts (6 sts)
Rnd 16: 2 Sc in next 2 sts, sc in each st aroud (8 sts)
Rnd 17: Sc in next 3, 2 sc in next st, sc in next 4 sts (9 sts)
Rnd 18: 2 Sc in next st, sc in each st (10 sts)
Rnds 19-20: Sc in each st.
*Insert a stitch marker to hold your place and stuff arm. Continue adding stuffing as you work the remaining rounds.
Rnd 21: *(Sc2tog, sc in next 3 sts), rep from * to end of rnd (8 sts)
Rnd 22: Sc2tog around (4 sts)
Fasten off and leave a long tail.

Cut a length of wire approximately 8" long. Bend one end into a loop small enough to run into the Arm. Insert the loop into the top of the Arm and thread all the way down into the hand end. Insert the other end of the wire into the Body at the shoulder area as shown, and out through the other side. Bend the tip of the wire into a loop and insert into the top of the second Arm. Stitch Arms to Body with matching yarn and a yarn needle, fully encompassing the wire. Weave in ends.
Hair:
The Hair is a crocheted hair cap that fits over the head.
Rnd 1: With yarn B, make an adjustable ring, ch 1, sc 6 into ring. Pull tail to close ring (6 sts)
Rnd 2: 2 Sc into each st (12 sts)
Rnd 3: *(2 Sc in next st, sc in next st), rep from * to end of rnd (18 sts)
Rnd 4: *(2 Sc in next st, sc in next 8 sts), rep from * to end of rnd (20 sts)
Rnds 5-7: Sc in each st.
Rnd 8: Ch 1, continue in same direction (do not turn), hdc in next st, dc in next 3 sts, hdc in next st, ch 1, sl st in next st. Leave remaining sts unworked. (5 sts)
Fasten off and leave a long tail. Position Hair on the back of the Head, with Row 8 at the back, tilted back. Use a yarn needle to sew the Hair to the Head, making a long straight stitch in the center front for a “widow’s peak”.

Ear (Make 2):
With yarn A and an E hook, make an adjustable ring, ch 1, sc 3 into ring. Pull tail to close ring. Fasten off, leaving a long tail for sewing.
Thread the yarn tail into a yarn needle and position ear onto head, overlapping hair cap and the head, lining up with the eyes on the side of the head. Refer to photo for placement. Weave in ends.
Beard:
With yarn B and D hook, ch 22. Sl st into 2nd ch from hook and next 5 chs, hdc in next ch, dc in next 7 chs, hdc in next ch, sl st into next 6 chs (9 sts, 12 sl sts)
Fasten off and leave a long tail for sewing.

Pin Beard to the doll’s face as shown, with sideburns just in front of ears. Black Panther’s beard is low on his jaw. Use yarn tail and needle to sew into place. Stitch straight lines up from the Beard to the hairline. Use yarn tail or another strand of black yarn to stitch a mustache, going from the edge of the Beard up, then across to under the nose. Repeat on other side. Refer to photo.

Mask:
The Mask is crocheted in finer gauge sport yarn and can be stretched slightly to fit over the Head snugly.
Rnd 1: With yarn E and a C hook, make an adjustable ring, ch 1, sc 6 into ring (6 sts)
Rnd 2: 2 Sc in each st (12 sts)
Rnd 3: *(2 Sc in next st, sc in next st), rep from * to end of rnd (18 sts)
Rnd 4: *(Sc in next st, 2 sc in next st, sc in next st), rep from * to end of rnd (24 sts)
Rnds 5-6: Sc in each st.
Ears
Rnd 7: Sc in next 8 sts, sc in front loop only of next st, ch 4, sc in 2nd ch from hook, hdc in next ch, dc in next ch, sc in front loop only of next st, sc in next 4 sts (working in both loops), sc in front loop only of next st, ch 4, sc in 2nd ch from hook, hdc in next ch, dc in next ch, sc in front loop only of next st, sc in next 8 sts around (24 sts + 2 ears)
Rnd 8: Sc in next 7 sts, hdc in next st, hdc in unworked back loops of next 2 sts, hdc in next 4, hdc in unworked back loops of next 2 sts, hdc in next st, sc in next 7 (24 sts)Rnd 9: Sc in next 5 sts, ch 1, hdc in next 3 sts, dc in next 8 sts, hdc in next 3 sts, skip remaining sts (5 sc, 14 sts)
Row 10: Ch 1, turn, hdc in next 4, dc in next 6 sts, hdc in next 4 (14 sts)
Row 11: Ch 1, turn, sc in first 2 sts, hdc in next 2, dc in next 2, 2 dc in next 2, dc in next 2, hdc in next 2, sc in next 2 (16 sts)
Row 12: Ch 1, turn, sc in each st across (16 sts)
Rnd 13: Do not turn. Continue working around, making your first st of Rnd 13 into Rnd 9. Sc into next 12 sts, working around the back of the Mask, sc in next 2, hdc in next 12, sc in next 2 sts (28 sts)
Rnd 14: Hdc in next 12 sts, sc2tog, hdc in 5 sts, 2 dc in next 2, hdc in next 5, sc2tog (28 sts)
Rnd 15: Ch 1, turn to work in opposite direction. Sc2tog, hdc in next 4, dc in next 4, hdc in next 4, sc2tog, hdc in next 12 (26 sts)
Rnd 16: Sc in next 3 sts, sc2tog 4 times, sc in next 3 sts, hdc in next 12 sts (22 sts)
Fasten off with a sl st into the next st. Weave in ends.
Mask Decoration:
There are two ways to stitch the mask. You can stuff it with polyester fiberfill, embroider it, then remove the stuffing, or you can just hold it spread open with your fingers while you do it. The second option works better for me because removing the stuffing is a little difficult. Definitely DO NOT put the mask on the doll while you stitch it.
Fit the Mask over the head, pulling the front down over the chin, and use pins or stitch markers to mark where the eyes should be. Remove the Mask from the Head. Thread a yarn needle with dark gray yarn C. Stitch eyes with several horizontal stitches where eyes should be. Continue stitching the pattern with the dark gray yarn as shown. Knot inside the Mask and weave in ends. Continue stitching with silver yarn D. Refer to photo. Weave in ends.


Suit Decoration:
All of the stitching on Black Panther’s suit is symmetrical. Nothing has to be perfect or precise, as long as each side is the same.
Referring to photos, Stitch straight stitches all along chest, back, Arms, and Legs with dark gray yarn C. Thread needle with silver yarn D and add the stitches over the gray at the hips, wrists, and calves. Stitch the necklace around the neckline, then overlap “claws” around the necklace. Stitch four claw toenails on each foot as shown. Weave in ends.


Finishing:
For the mouth stitch a straight stitch two rnds below the nose. Thread a yarn needle with pink yarn scrap and stitch one long and one shorter straight stitch under the mouth for a lip. Rub a little brown eyeshadow on the lip if the color looks too bright.

Please let me know if you have any questions about this pattern, or if you need any help. This pattern may not be printed and sold or listed online for sale. Please inquire about using the pattern to make toys to sell at info@craftyiscool.com.
The characters in this pattern are created solely as fan art and are not meant to be exact or direct representations of any copyrighted characters or entities.
*If you would like to sell the items you make from this pattern or any of my patterns, please feel free, but on your listings make sure to include "Pattern by Allison Hoffman/craftyiscool.com"