Showing posts with label Valentine's Day. Show all posts

Wednesday, February 10, 2016

Kissing Piggies! Free Valentine's Day Pattern

KISSING PIGGIES

I wrote this pattern for Michael's stores a couple of years ago for Valentine's Day. They make a cute little gift for your special someone!

Two sweet little piggies kiss with the help of magically magnetic snouts. Crocheted in squishy soft Loops & Threads® Snuggly Wuggly™ baby yarn, these two make precious Valentine's gifts that are fun to make and fun to play with.

MATERIALS

Loops & Threads "Snuggly Wuggly" – Pink (A, 1 skein) and Candy Pink (B, 1 skein)
Crochet Hook, Size 3.0mm (US D/3)
Tapestry Needle
Polyester fiber-fill
Black DMC Embroidery Floss (1 skein)
2 - Black rounded 0.63 cm (1/4") buttons with shank or 5mm safety eyes
2 - 0.63 cm (1/4") extra strength or heavy duty magnets
Embroidery Needle
Scraps of matching fabric (for ears)
White thread
INSTRUCTIONS

Body (Make one with yarn A, one with B)

With yarn and D hook, make an adjustable ring, ch 1, sc 6 into ring. Pull tail gently to close ring.

Rnd 1: Work 2 sc into each st (12 sts)

Rnd 2: *(2 Sc into next st, sc into next st), rep from * to end of rnd (18 sts)

Rnd 3: *(2 Sc into next st, sc into next 2 sts), rep from * to end of rnd (24 sts)

Rnd 4: *(2 Sc into next st, sc into next 3 sts), rep from * to end of rnd (30 sts)

Rnd 5: *(2 Sc into next st, sc into next 4 sts), rep from * to end of rnd (36 sts)

Rnds 6-14: Sc into each st around.

Rnd 15: *(Sc2tog, sc into next 4 sts), rep from * to end of rnd (30 sts)

Rnd 16: *(Sc2tog, sc into next 3 sts), rep from * to end of rnd (24 sts)

Rnd 17: *(Sc2tog, sc into next 2 sts), rep from * to end of rnd (18 sts)

*Insert a stitch marker to hold your place. If you are using safety eyes, insert them now according to package directions, between Rnds 4 and 5, 9 sts apart. Stuff body firmly. Continue adding stuffing as you complete the next two rounds.

Rnd 18: *(Sc2tog, sc into next st), rep from * to end of rnd (12 sts)

Rnd 19: Sc2tog around (6 sts)

*You will continue crocheting to make the tail.

Row 20: Sl st into next st, ch 8, work 3 sts into 2nd ch from hook and next 5 ch, sl st into next st (18 sts)


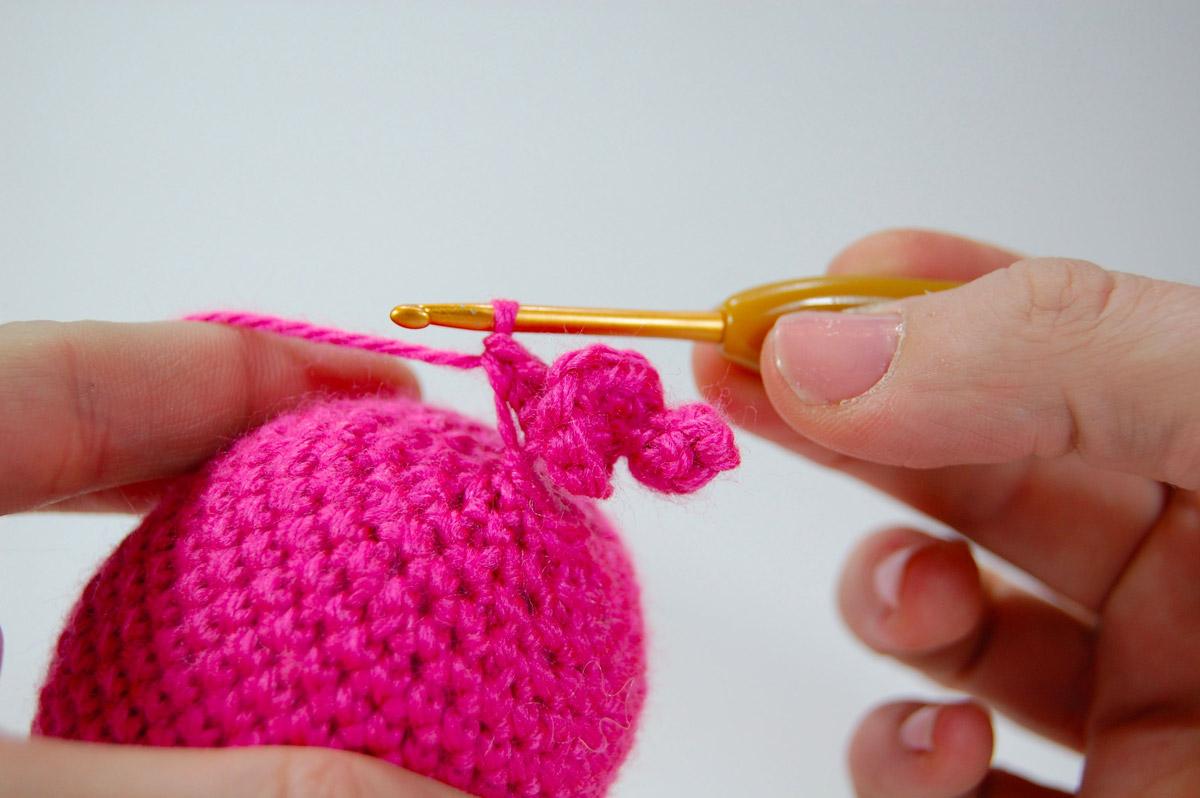
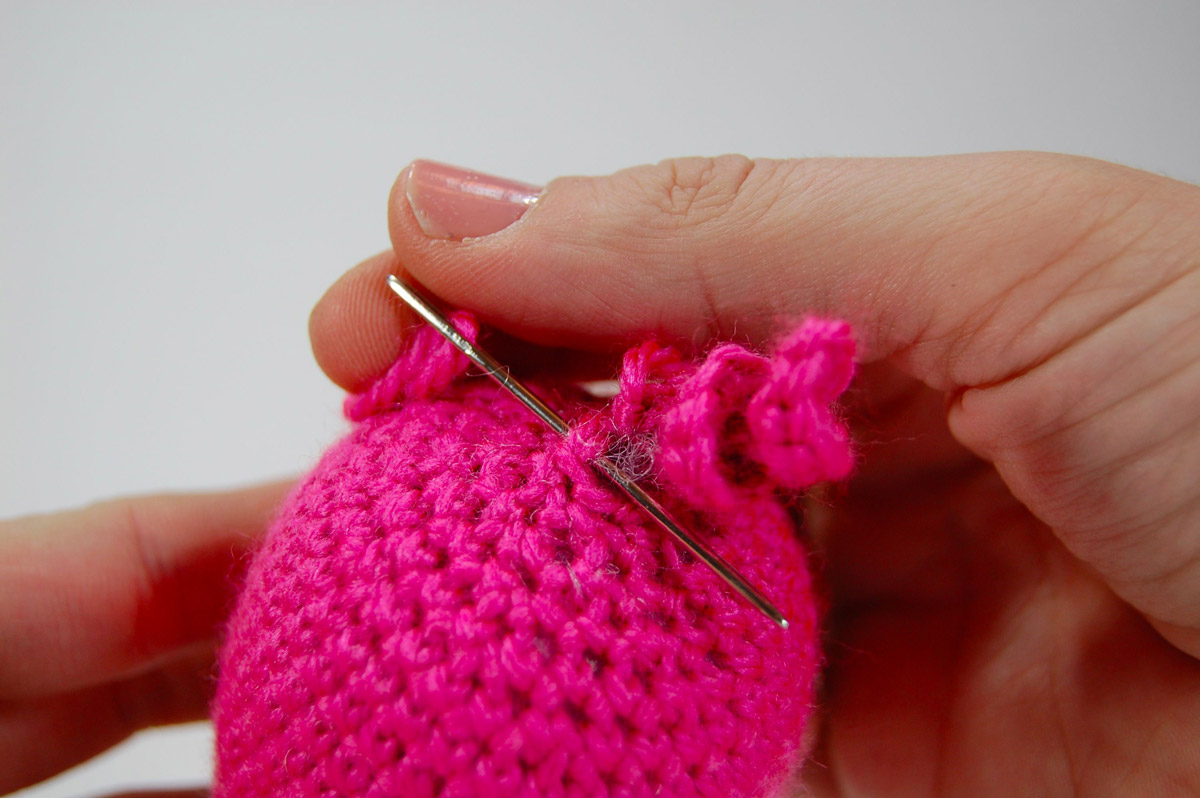


Fasten off, leaving a long strand of yarn for sewing. Use a yarn needle to weave the remaining strand through the last round, closing the hole. Weave in ends.


Snout (Make one with yarn A, one with B)

With yarn and D hook, make an adjustable ring, ch 1, sc 6 into ring. Pull tail gently to close ring.

Rnd 1: Work 2 sc into each st (12 sts)

Rnd 2: Working into Back Loops Only (BLO), sc into each st around (12 sts)

Rnd 3: Working into both loops of each st, sc into each st (12 sts)

Fasten off, leaving a long tail for sewing. Use black embroidery floss to embroider two straight stitches onto Snout for nostrils.

Sew Snout to Body, centering it between the eyes, and leave an opening. Insert the magnet into the Snout, then fill in with stuffing. Finish sewing opening closed. Weave in ends.


When creating second Snout, make sure to check that the magnets are situated in each Snout to attract, rather than repel, each other.


Legs (Make four with A, four with B)

With yarn and D hook, make an adjustable ring, ch 1, and sc 5 into ring. Pull tail gently to close ring.

Rnds1-5: Sc into each st around (5 sts)

Fasten off and leave a long tail. No stuffing is necessary. Sew Legs to underside of Body.

Ears (Make two with A, two with B)

With yarn and D hook, make an adjustable ring, ch 1, and sc 3 into ring. Pull tail gently to close ring.

Rnd 1: Work 2 sc into each st around (6 sts)

Rnd 2: *(2 Sc into next st, sc into next st), rep from * to end of rnd (9 sts)

Rnd 3: 2 Sc into next st, sc into next 8 sts (10 sts)

Rnd 4: Sc into next 5 sts, 2 sc into next st, sc into next 4 sts (11 sts)

Rnd 5: Sc into each st around.

Fasten off and leave a long tail for sewing. Flatten Ear to form a triangle. Sew to Body three rows behind each eye.

Flower (Make one with B)

With yarn B, make an adjustable ring, ch 1, and sc 9 into ring. Sl st the opening closed.

Rnd 1: *(Ch 1, dc and hdc into next st, sl st into next st), rep from * to end of rnd. Last sl st is made into first st of the round.

Fasten off, leaving a long tail. Sew onto Piggie's head near her ear.

Finishing

Thread the embroidery needle with embroidery floss, knotting one end. Insert the needle into the Body under the Snout and make a "v" smile with the embroidery thread, keeping the stitches loose to round out the smile. Bring needle back up to the surface between stitches and knot the thread close to the fabric. Insert needle back into Body and out through a stitch, clipping it close to the surface so that it retracts back inside.

Cut two 0.63 cm (¼") triangles from fabric scraps and stitch into place on Ears with white thread.


Abbreviations
Ch: Chain
Sc: Single Crochet
Hdc: Half Double Crochet
Dc: Double Crochet
St: Stitch
Rnd: Round
Rep: Repeat
Techniques

Adjustable ring: Make a ring with yarn. Insert hook into ring, yarn over and draw up a loop. Ch 1, as directed in pattern. Work the stitches required in pattern into the ring. When complete gently, but firmly, pull tail to close up the ring.

BLO(Back Loops Only): Instead of inserting hook under both loops of the next stitch, insert hook under only the back loop of the stitch. This leaves an unworked loop in the front.

TIPS

The pieces are all crocheted in the round in unjoined spirals. Use a locking stitch marker if necessary to mark the beginning of each round. When you complete a round, move the marker to the loop on your hook and continue crocheting.

Oink Oink! Enjoy! Happy Valentine's Day!

Thursday, February 9, 2012

Have a Heart!

You know what I'm going to do? I'm going to start blogging every day! OK Let's start at every OTHER day. I know blogs are way more interesting when there is new content more frequently and that is my goal.
So for today's post, I want to tell you about a class I'm teaching this weekend at The Knitting Nest in Austin. It should be pretty fun, really easy, and you will go home with probably several projects!

If you're a mom, I KNOW you are busy. Working moms feel like they don't have enough time at home and stay at home moms feel like they are being pulled in all directions all the time too! As women we are caretakers, maids, chefs, frugal shoppers (me! me!), school liaisons, and if we are lucky, we like to do fun things for ourselves.

This Saturday, indulge your crafty side and your mommy side. I'm teaching a crochet class to make teeny tiny crocheted hearts for Valentine's Day. That's not all. Stacy, the ultra-crafty mom and grandma, who also happens to run the Knitting Nest, will have cards and all the supplies you will need to make handmade Valentines so your kids will bring the most popular cards to the party! It will be really easy. Did I say easy? Even if you've never crocheted before, I promise, when I'm done with you, you will have a stack of little crocheted hearts to make Valentines with.


The little heart is attached to a jumbo paperclip and detaches from the card to use as a bookmark. Cute, right?? Inspired by a pin on Pinterest, these will be the coolest cards ever. All the kids will love 'em.

While this is an awesome class for the grownups (not just Mom, of course!), kids can get in on the action later in the day at a Friendship Bracelet class. I know when I was growing up in the late 80s and early 90s, Friendship Bracelets were HUGE. Every week there was some new design someone was making. We put one on and KEPT it on. Never took those things off, even in the shower. I remember pulling tights over my Friendship Anklets, feeling like such a good friend. :)

If you're interested in either of these classes, please call the Knitting Nest at (512) 291-8866 to sign up. I'm also continuing my Thursday morning classes (every other week) with my next class on Thursday, February 16th at 10:00. We're making amigurumi, of course!

Friday, January 13, 2012

Free Pattern Friday! Valentine's Day Yarn Wreath

Valentine's Day Yarn Wreath
As soon as the Christmas decorations come down in my house, I like to get things moving on to the next holiday. Sure I could try to decorate for "Winter" but I really love red and pink and hearts and all that stuff, so I go straight for Valentine's Day!
I'm sure some people would wait until February to decorate (if they decorate at all) but then what do you have? Two weeks? No way! I say decorate in January and revel in the awesomeness longer. (That is the reason I decorate for Halloween at the beginning of September, after all!)

I have a spot in my kitchen where I always hang a wreath. My front door is a craftsman-type, with windows at the top and a little ledge, so I can never quite figure out hanging a wreath there. I always look for a cute wreath for Valentine's day at the usual places: Target, Hobby Lobby, etc, but I never find the right one. So with all these awesome yarn wreaths I love to drool over on Pinterest, I thought I'd make my own! This one is super easy and the heart pattern is fun and quick.

Free pattern after the jump!


Saturday, September 17, 2011

For the ultimate girly-girl

My niece just turned 9. Besides a Build-a-bear (which Grandma already got her) and a cotton candy machine (which I thrifted for $7.99 at Thrift Land here in Austin--woohoo!), there wasn't too much she'd asked for. That's where the handmade stuff comes in! Sacrifice a little time, some materials you already have (and BOY do I have some materials!), and you'll give a gift that will be cherished for years to come!

I have three boys. I do not get to buy stuff with hearts, rainbows or fluffy clouds. I went all out on finally getting to make a super-girly accessory. Browsing Ravelry I'd seen several rainbow scarves. They were all basically the same so I just winged it. I got out a rainbow of similar-weighted yarn, all washable acrylics, and got to work.


Here's a simple tutorial if you'd like to make your own!

Rainbow! Hearts! Fluffy Clouds!
Rainbow Scarf:

Materials:
Worsted weight yarns (any number of colors)
Fluffy white yarn (for clouds)-- I used Baby Bee "Lambie Pie" from Hobby Lobby
Pink worsted weight yarn (for heart)

Tools:
Size G crochet hook
Yarn needle

Scarf:
Ch between 152 and 252 ch (depending on child's --or adult's-- height).
R1: Dc into 3rd ch from hook and each subsequent ch. Change colors on the last stitch, using the new color to complete the stitch.
R2: Ch 2, turn. Dc into each st.
Repeat R2 until you have finished all the colors of your rainbow. Weave in ends.

Clouds (make 10):
With white fluffy yarn, make an adjustable ring and ch 1. Sc 6 into ring and pull closed.
R1: 2 Sc into each st (12)
R2: (2 sc into next st, sc into next st)* rep to end of round (18)
R3: (2 sc into next st, sc into next 2 st)* rep to end of round (24)
R4: (2 sc into next st, sc into next 7 st)* rep to end of round (27)
Fasten off and leave tails.
Using the yarn needle, overlap five of the circles to make a fluffy cloud shape. Sew them together with the yarn tails. Sew the assembled cloud to one side of the scarf end. Flip cloud over and sew the remaining circles to the back of the cloud, lining them up. You may lightly stuff the cloud if desired. Weave in ends.

Heart (make 2):
Refer to THIS pattern to make big pink hearts. Thanks Red Heart and fabulous designers!
Sandwich the hearts together and stitch the bottom halves together. Insert the end of the scarf and continue stitching them together through the scarf. Weave in ends.

Maybe I'll keep it...?

Just in time to make several for Christmas! Am I right?

Wednesday, January 13, 2010

Prepping for Valentine's anyone??


In the grand tradition of procrastinating on this blog, I now present the third free pattern I promised way back in '09.  Ok, that wasn't really all THAT long ago, was it?  But it sounds like it :)

When I set up a demo booth at the Handmade Nation craft fair here in Austin, one of the kits I put together was for this here little Happy Heart Pin.  I thought it would be fitting to post this baby up before Valentine's Day.  If you're especially productive, you could even crochet up a couple dozen and pin them on some cute homemade cards for your kids at school.  If you aren't so dedicated to spreading the handmade love, you could just make one for yourself to wear around for a few weeks leading up to Valentine's day. 
Here she is!


Happy Heart Pin

Materials:
Red worsted weight yarn
Black safety eyes (6mm)
Black embroidery floss
(E-I) Hook (larger hook will make Happy bigger)
Yarn needle
Polyester stuffing
Pinback
Craft glue

Key:
ch: chain
sc: single crochet
st: stitch
sc2tog: single crochet 2 st together (decrease)

*     *     *

Starting at point of heart and with red yarn, make an adjustable ring, ch 1, and sc 3 into the ring. Pull closed.

R1: Work 2sc into each st (6)

R2: (2sc into next st, sc into next st)* repeat to end of round (9)

R3: (2sc into next st, sc into next 2 st)* repeat to end of round (12)

R4: (2sc into next st, sc into next 3 st)* repeat to end of round (15)

R5: (2sc into next st, sc into next 4 st)* repeat to end of round (18)

R6: sc into the next 9 st, skip next 9 st.

(**You have now started the right side of the top of the heart.)

R7: starting at the first stitch of R6, sc into each st (9)

R8: (sc2tog, sc into next st)* into each st (6)

Fasten off by slip stitching into the next stitch. Leave a tail . Using the yarn needle, weave tail through last row of stitches and pull tightly to close the hole.

You should now insert the eyes into the heart. The backing piece will be snapped onto the back, inside the heart. It will be a tight fit!

Attach yarn back onto the open side of the yarn, starting on the inside and you will work around the opening. You can either tie a knot to attach the new yarn or you can insert the hook on the outside into the first stitch and pull the yarn up through the work, and sc for your first stitch. Repeat R6-8 on the other side to create the second top bump.

Embroider a tiny smile onto Happy Heart's face.

Glue pinback onto the back of the heart.

LOVELY!
Related Posts Plugin for WordPress, Blogger...